
(under construction)
Using the church computer, screen projector, CD and DVD players
Creating PowerPoint presentations for hymns
Creating and displaying videos
Main power switch
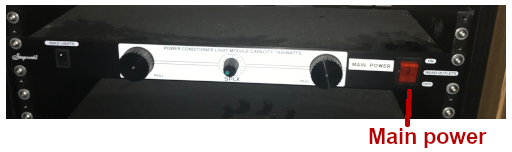
Turn the Main Power on and off using the red button on the box located below the desk and cupboards. DO NOT adjust any other controls on this box.
Sliders

- Each channel on the board has a dedicated slider control. The function of each channel is shown in the list below. For instance, the main pulpit microphone is channel #2. Note that the larger the number the more quiet the channel, for instance “20” is “-20 decibels” (db).
- Besides adjusting the sound level for that channel’s input, the only other button you should use is the large Mute button at the top of the slider, which shuts off sound from that channel, indicated by the yellow Mute light being on. Generally, you should set a good slider level during a sound check before the service and then mute the channel until that part of the service that uses that sound source. Mark up a bulletin with the appropriate channel number for each part.. Pay attention to the order of worship and be prepared to unmute that slider, then slightly adjust the volume level where needed.
- A flashing red Clip light indicates too high a level, which probably results in distortion.
- The rightmost slider on the board is labeled Main. This controls the entire board sound level, and is generally set around 0 db. Generally you should leave this level at that setting. If you encounter feedback, however, and don’t know which channel it is coming from, you can pull the Main slider all the way to the bottom to quickly kill all of the sound.
- For complicated setups, you can use the blue painter’s tape in the drawer to label each channel used with its specific use for that service.
Sound board channels
| Channel | Use |
|---|---|
| 1 | Stage connection |
| 2 | Main pulpit microphone |
| 3 | Stage connection |
| 4 | Stage connection behind piano |
| 5 & 6 | Left rostrum connections (in flower box) |
| 7 & 8 | Right rostrum connections (in flower box) |
| 9 | Bad channel – do not use |
| 10 | Open |
| 11 | Open |
| 12 | Lapel mic |
| 13 | Lapel mic 2 |
| 14 | Handheld “new” |
| 15 | Handheld “white” |
| 16 | Lapel mic #16 |
| 17 | Lapel mic #17 |
| 18 | Lapel mic #18 |
| 19 | Lapel mic #19 |
| 20 | Blue handheld |
| 21 | Orange handheld |
| 22 | Open |
| 23 & 24 | Computer audio |
| 25/26 | CD player |
| 27/28 | DVD player |
| Main | Main volume level – set at about the 0 db mark |